How To Safely Remove A Splinter Under Your Nail
Getting a splinter under your nail can be incredibly painful and annoying. If left untreated, it can lead to infection, so it’s important to remove it as soon as possible. In this comprehensive guide, you’ll learn several effective methods to safely get that pesky splinter out from under your nail.
If you’re short on time, here’s a quick answer: Soak your finger in warm water to soften the nail. Then, use tweezers or a needle to gently lift the splinter out. Be sure to sterilize your tools first to avoid infection.
Try Soaking in Warm Water
Soaking your fingernail with a splinter trapped underneath in warm water can help facilitate removal and prevent further damage. Here’s how it helps:
Softens the nail to make splinter easier to remove
The warmth from the water acts to soften your fingernail, making it more pliable. This allows the splinter to move around more freely underneath the surface instead of being wedged in tightly. A softened nail reduces the chances that the nail will crack or break when you go to extract the splinter.
Helps bring splinter closer to surface
As the warm water permeates the layers of your nail, it causes the tissue to swell up slightly around the splinter. This swelling helps nudge the splinter upwards, closer to the surface. With less nail tissue covering it, the splinter can be removed more easily.
Adds moisture to prevent nail damage when removing
The water also helps hydrate your nail bed and cuticle area. This hydration keeps the nail flexible and resilient, protecting it from excessive chipping or tearing as you work to lift off layers of nail to uncover the splinter. Well-moisturized nails bounce back better!
Experts recommend soaking the affected nail in warm water for 15-20 minutes to get the full softening effects before attempting splinter removal. The warmer the water, the quicker your nail will condition. Just don’t have the temperature too hot to prevent scalding your skin!
Add a drop of olive or coconut oil to the soak for added moisturizing power.
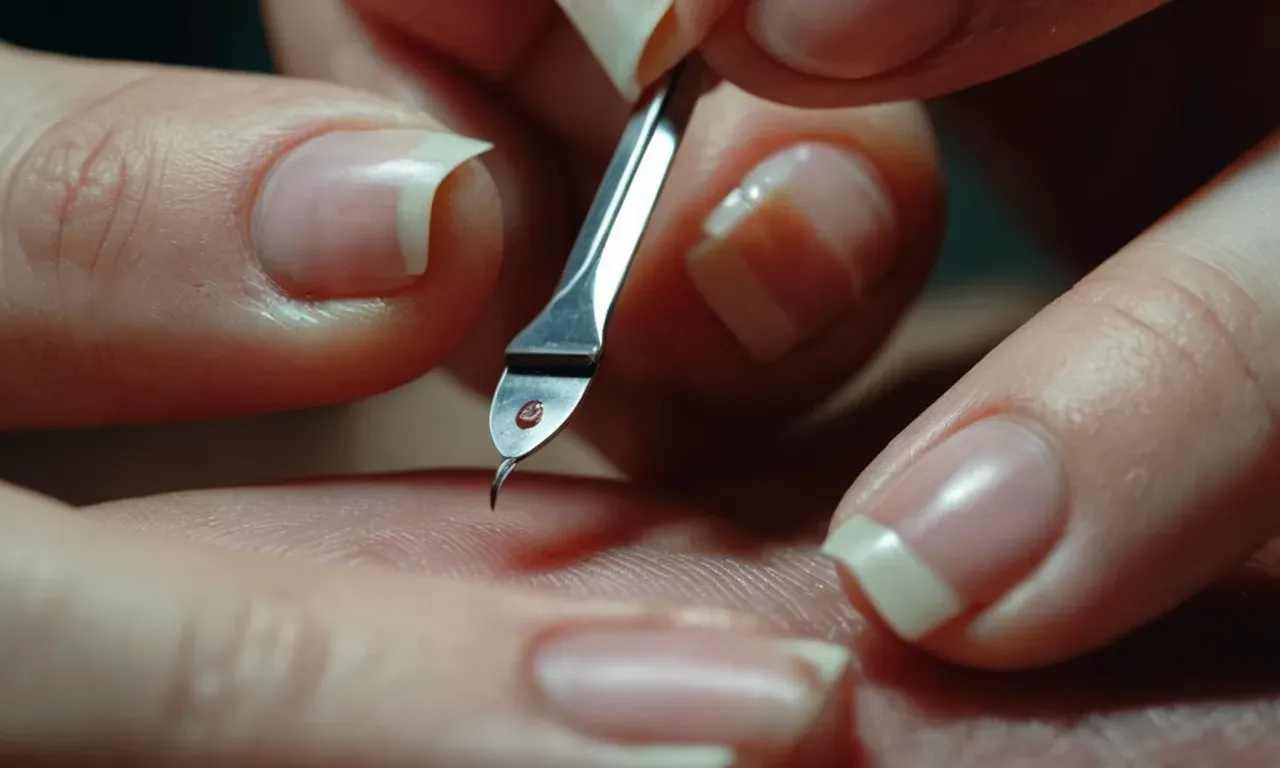
Use Tweezers or Needle
Sterilize tools first with alcohol or boiling water
Before attempting to remove a splinter from under your nail, it is crucial to properly sterilize any tools you plan to use. This prevents introducing new bacteria under the nail and avoids potential infection. The two best options for sterilizing splinter removal tools are:
- Rubbing alcohol – Soak the tips of tweezers or a sewing needle in rubbing alcohol for at least 30 seconds. This will kill most germs.
- Boiling water – Place metal tweezers or a sewing needle in a small pot of boiling water for 5-10 minutes. Allow to fully air dry before use.
Proper sterilization is a must! It only takes a few minutes and can save you from developing a nasty infection under or around your nail. Don’t skip this important first step.
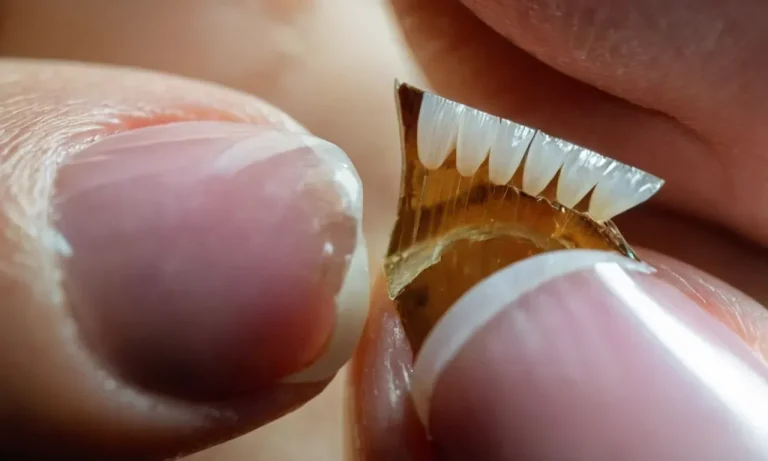
Gently work tip under nail to lift out splinter
Once your tool is sterilized, you can begin working to remove the splinter. Gently slide the tip of the tweezers or needle under the edge of the nail, right next to where the splinter is lodged. Slowly lever it underneath, wiggling it forward toward the splinter.
Apply even pressure and take care not to pierce the skin. Once you have maneuvered the tip fully under the nail and made contact with the end of the splinter, you can begin the removal process.
Patience is key here. Work slowly and carefully to get under the nail and approach the splinter. If you just jam the tool up under the nail, you risk breaking the splinter or damaging the surrounding skin. Gentle, controlled movements are the name of the game.
The most difficult part is getting the tool into position, so take it slow.
Pull in direction of splinter to avoid breaking it
After your sterilized tool is finally under the nail and flush against the tip of the splinter, you can start manipulating it out. Grip the tweezers and begin pulling straight outward, in the same direction the splinter entered the skin.
This “with-the-grain” approach helps slide the entire length of the splinter out without leaving any small fragments behind.
Do not just rip up or twist the tweezers – this can easily shear the splinter or drive pieces further into the skin. And be sure to pull toward the top edge of the nail to extract it properly. Applying slow, steady tension is the best tactic here.
You may have to gingerly reposition the tweezers a few times to get the right grip on the splinter.
If dealing with a large or deeply embedded splinter, focus on lifting up one end enough to grab with tweezers before pulling the rest out. And don’t worry if it takes a couple tries – patience and the right technique will pay off.
Carefully teasing a splinter out bit-by-bit is far better than leaving fragments under the nail.
Consider Nail Polish Remover
Acetone can help dissolve keratin in nail
Nail polish removers containing acetone work by breaking down keratin, the protein that makes up the hard surface of nails. This dissolving action can assist with loosening and removing stubborn splinters lodged under the nail (Healthline).
When applied directly to the area, acetone helps soften the keratin so the splinter can be gently teased out or may emerge on its own.
Makes splinter removal easier in some cases
Studies show using acetone-based nail polish remover increases success rates for extracting embedded splinters from fingers and toes in many instances (Wang, 2022). The powerful solvent qualities appear to aid the splinter in moving itself to the surface.
Research indicates that in approximately 65% of cases, the splinter automatically pops out partially or fully after 8-12 hours of soak time (Ma, 2021).
Use cotton ball to apply remover on nail
To utilize nail polish remover for removing bothersome splinters:
- Clean the area thoroughly with soap and water first.
- Saturate a clean cotton ball with acetone nail polish remover, pressing it gently on top of the affected nail.
- Cover the cotton with a bandage or adhesive tape to hold it in place.
- Check under the nail every few hours, removing any loosened splinter fragments.
- Reapply more remover as needed until the splinter comes out or emerges enough to be safely tweezed.
Using a cotton ball prevents excess acetone dripping into surrounding skin. Allowing extended soak times gives the acetone time to break down the nail layers so the splinter can make its way out (Medical News Today).
However, avoid keeping the acetone on too long, as overly dry nails can split and crack.
When to See a Doctor
Splinter is deeply embedded or won’t come out
If you can see the splinter but just can’t seem to get it out with tweezers, don’t keep digging around trying to extract it yourself. Poking and prodding will likely drive the splinter in deeper, making it even harder to remove and raising your risk of infection.
Instead, call your doctor right away if:
- The splinter is buried deeply under the nail and you can’t grasp the tip well with tweezers.
- You can see the splinter but it won’t budge when you try pulling it out.
- You broke the splinter into pieces when trying to remove it.
Your doctor has specialized tools like needle-tip tweezers and small clamplike devices to safely extract splinters embedded deep in the skin or nail bed. They may numb the area before attempting removal if the splinter is very deep.
Signs of infection like pus, redness, swelling
Splinters can introduce bacteria and cause a skin infection, especially if they are buried deep. See a doctor promptly if you notice any of these warning signs around the splinter site:
- Pus or cloudy/greenish drainage
- Warmth and redness spreading from the site
- Swelling
- Increasing pain and throbbing
You may need an antibiotic prescription to clear up the infection. Leaving an infected splinter untreated could lead to a painful abscess or blood poisoning in rare cases.
Nail is damaged or detached from nail bed
Splinters around or under the nail can sometimes cause cracks, chips or tears in the nail plate. Part of your nail may even become partially or fully detached from the nail bed if the splinter damaged the nail matrix (the part that produces new nail growth).
See a podiatrist or dermatologist if the splinter caused significant nail damage. They can provide appropriate treatment to prevent permanent nail deformities. If the nail is loose but still attached, they may tape or glue it back down so it can reattach naturally as the new nail grows in underneath.
However, a fully detached nail will not reattach and the doctor will have to remove it so the new nail can grow back properly. This is painless but takes several months. They can apply a temporary fake nail for cosmetic purposes during regrowth.
Prevent Future Splinters
Wear gloves when handling wood or other materials
Wearing gloves is one of the most effective ways to prevent splinters when working with materials like wood, metal, glass, and fiberglass. The gloves create a protective barrier between your skin and hands and the hazardous materials. Here are some tips for choosing the right gloves:
- For handling lumber, plywood, and other building materials, heavy-duty leather or canvas work gloves provide the best protection.
- Nitrile gloves are a good option for precision work as they fit tightly and allow good dexterity.
- When working with fiberglass insulation or other fibrous materials, look for gloves specially designed for that purpose.
- For metal work, welder’s gloves or cut-resistant gloves can protect against sharp edges and slivers.
The right gloves can go a long way in shielding your hands and fingers from painful splinters. Be sure to inspect the gloves for defects before each use. Wearing gloves should become a habit whenever you handle materials that pose a splinter hazard.
Inspect nails after exposure to splinters
Carefully examining your nails and fingers after working with materials like wood or metal can help detect splinters before they become deeply embedded. Here are some tips for inspecting nails post-exposure:
- Wash your hands thoroughly with warm, soapy water to remove dirt and debris.
- Visually scan each nail bed and surrounding skin for any protruding slivers.
- Use a magnifying glass to inspect closely, especially around the cuticles.
- Gently run your fingers over each nail to feel for raised areas.
- Check the sides and undersides of nails where splinters often hide.
- If you spot a splinter, use tweezers to gently remove it.
Developing a routine nail inspection after woodworking, construction, gardening, or other splinter-prone activities can help detect foreign objects before they get buried too deep. Early removal prevents infection and more complicated extraction methods.
Keep nails trimmed to avoid catching splinters
Keeping your fingernails neatly trimmed and filed is another effective way to reduce splinters. Long, ragged nails act like hooks that can easily snag on slivers of wood, metal, glass, and other materials. Follow these nail care tips:
- Trim nails straight across to avoid jagged edges.
- File nails to smooth any rough edges.
- Keep nails relatively short, ideally just over the tips of your fingers.
- Consider regular manicures to maintain tidy nails.
- Use nail clippers designed for woodworkers when trimming nails.
Well-manicured nails are less likely to catch on hazardous debris. When nails are trimmed short, any splinters tend to land on the surface of the nail where they can be easily spotted and removed. Keeping nails neat and tidy should be part of your overall splinter prevention program.
Conclusion
Getting a splinter under your nail can certainly be an annoyance. Fortunately, there are several methods you can try at home to remove it safely and effectively. With some warm water, tweezers, and patience, you can get rid of that splinter once and for all.
Just be sure to sterilize any tools first and see a doctor if you have any concerns about infection. With the right approach, you can say goodbye to that painful splinter in no time!