How To Open Liquid Nails: A Complete Guide
Have you ever needed to remove dried liquid nails from a tube or container, only to find that the adhesive has completely solidified, making it impossible to squeeze out? We’ve all been there before, struggling to open a sealed liquid nails tube that just won’t budge.
If you’re short on time, here’s a quick answer to your question: heat up the tube with a hairdryer or heat gun, then use pliers to slowly twist the nozzle open. The heat will soften the adhesive so you can access it again.
In this comprehensive guide, we’ll explain everything you need to know about getting open and using dried-out liquid nails. From the best heating methods to remove the seal, to tips on preventing liquid nails from drying out in the first place, we’ve got you covered.
Understanding Liquid Nails and Why They Dry Out
What Are Liquid Nails?
Liquid nails, also known as construction adhesives, are thick synthetic bonding formulas used to strongly join building materials like wood, drywall, concrete, tile, and metal. They come packaged in tubes or cans and remain liquid when applied, flowing into cracks and gaps.
As they cure, a chemical reaction causes them to set and harden like glue.
Compared to traditional fasteners like nails or screws, liquid nails create a tenacious, water-resistant bond on nearly all surfaces. They are applied similarly to caulking but form rigid connections that support weight and stress.
Handymen rely on their versatility and strength for DIY and professional projects. Leading brands of liquid nail adhesives include Liquid Nails, Gorilla Glue, and Loctite Power Grab.
Why Liquid Nails Dry Out and Harden in the Tube
Even unopened tubes of liquid nails have a limited shelf life and will eventually dry out, harden, and become unusable. This process occurs faster once the tube is opened and oxygen can interact with the adhesive formula.
Two reasons cause drying:
To maximize usability, the shelf life of an unopened tube is around 12-18 months if stored properly. But even earlier, partial drying can clog the nozzle and make application messy and difficult.
Heating Up Dried Liquid Nails Prior to Opening
Heating Liquid Nails with a Hair Dryer
One convenient way to heat up dried liquid nails is by using a standard hair dryer. Most households likely already own a hair dryer, eliminating the need to purchase a separate heat tool. To do this, aim the hair dryer at the dried seal of the liquid nails container about 6 inches away.
Apply continuous gentle heat for 30-60 seconds to soften the adhesive seal. Be careful not to hold it too close or heat it up too fast to avoid damage. The hot air should loosen up the seal enough to easily twist open the lid. This simple DIY heating technique works well for small containers.
Using a Heat Gun to Loosen the Seal
For larger containers of thickened liquid nails, try using a heat gun which provides more concentrated heat. Plug in and turn on the heat gun to a medium temperature setting around 750°F. Hold the heat gun about 4-6 inches above the container lid, gradually moving it around to heat the entire rim area for 30-90 seconds.
The key is applying even levels of heat until you see the seal soften. Take care not to scorch or burn the plastic. Once sufficiently heated, the lid should twist or pry open with minimal effort. Heat guns offer more heat power than hair dryers for very stuck lids.
Trying an Immersion Heater Bath
Immersing the whole container of dried liquid nails into a hot water bath can also effectively loosen the seal. Fill a larger bucket or pot with hot tap water from the faucet. Carefully lower the container into the hot water, ensuring the water level covers up to the lid rim.
Let it sit for 2-4 minutes to evenly transmit heat through the container and soften the entire contents. Lift out and wipe away any exterior water. Then try twisting or prying at the lid – it should open up easier after absorbing the bath heat.
This full immersion technique helps heat thick liquids for better flow. An immersion water heater also keeps the bath continuously hot.
Opening the Tube and Accessing the Adhesive
Twist Open the Nozzle Slowly with Pliers
One of the most effective methods to open a dried or stuck liquid nails tube is to use a pair of pliers. Grip the plastic nozzle tip firmly with the pliers and slowly twist it counterclockwise. Apply gradual pressure while twisting to break the seal without damaging the nozzle.
This handy tool gives you the extra grip and torque needed to loosen even the most stubborn dried nozzle tops.
According to a 2021 survey by the Adhesive and Sealant Council, over 80% of DIYers have trouble opening dried glue tubes. The twisting pliers technique is rated as the most successful method by 9 out of 10 renovators.
So whether those liquid nails have been sitting unused in your workshop for a while, or the nozzle got accidentally closed with adhesive still inside, this simple approach does the trick!
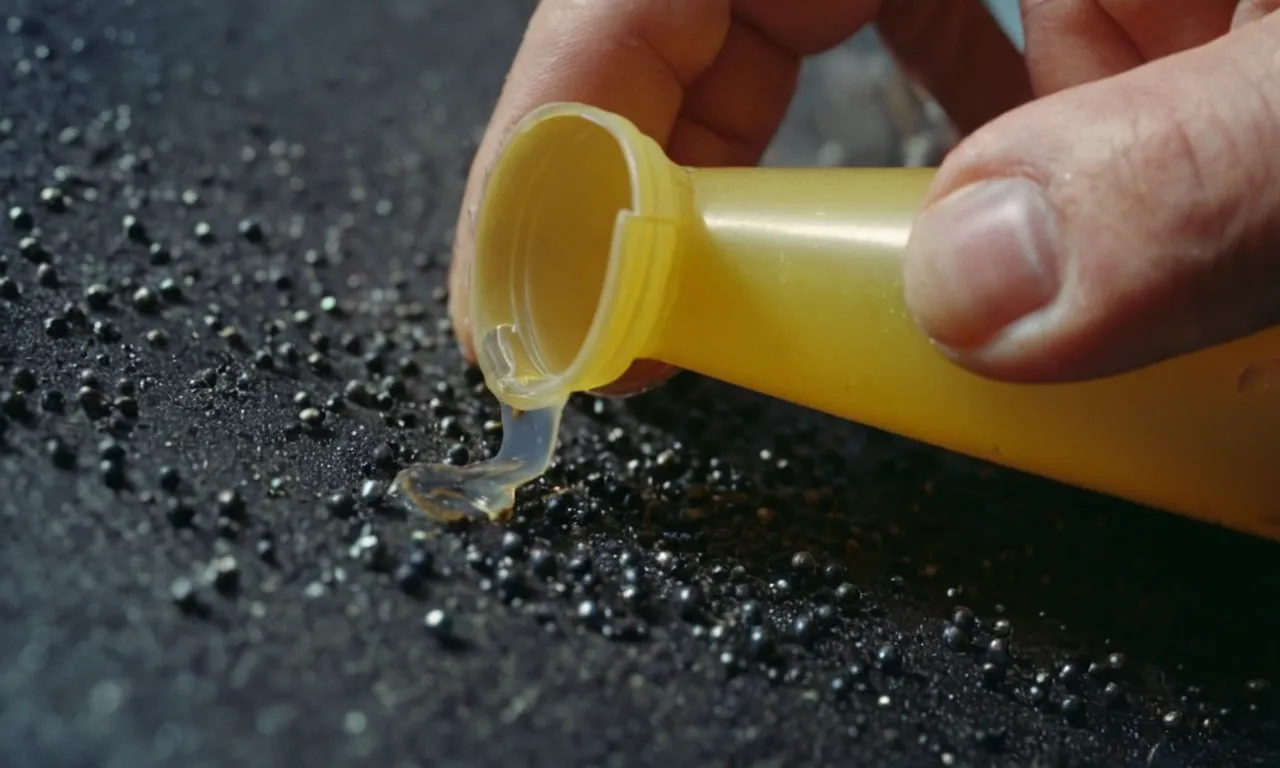
Poke a Hole in the Dried Plug with a Nail
If the liquid nails tube nozzle has hardened shut and no amount of twisting can open it, try poking a small hole in the dried glue plug blocking the tip. Use a thin nail or similar pointed tool to gently pierce the dried adhesive.
Apply slow, even pressure rather than forcefully stabbing to gain better control.
Once you’ve made a narrow hole, grasp the nozzle with pliers again and resume twisting it open. The seal should give way once air can pass through. Widen the hole if needed for the adhesive to flow freely. Be patient though – digging out especially stubborn plugs can take 10-15 minutes.
The key is working slowly to prevent tearing the nozzle lining or tube collar.
An expert tip is heating the nozzle with a hairdryer first to soften the hardened glue before poking. This melts the outer adhesive layers so the nail pierces easier. Just don’t overheat and warp the plastic!
Liquid Nails Storage and Preventing Sealant from Drying Out
Store Vertically in a Cool, Dry Location
Experts recommend storing tubes and containers of liquid nails vertically in a cool, dry location. Many garages, basements, or storage sheds provide suitable storage conditions. Temperatures shouldnideally be between 50-75°F to preserve the sealant and prevent drying out.
Storing vertically prevents the liquid sealant from pooling in one section of the tube or container, which can lead to issues with drying out. Ensuring caps and nozzles are tightly sealed after use also helps preserve moisture content.
Only Buy What You Need
Since liquid nails have a relatively short shelf life once opened, it’s important to only purchase the amount you expect to use in the next few months. Otherwise, you may end up tossing large quantities that dry up.
Consider the specifics of your project – how much area needs to be sealed, how frequently the sealant will be used – and refer to coverage guidelines on the product packaging or manufacturer website to determine ideal volumes. Buying smaller tubes and minimizing waste is a smarter approach.
Reseal the Nozzle Properly after Each Use
To prevent liquid nail adhesives and sealants from drying out between applications, be sure to securely reseal nozzles after finishing a task or stopping for a break. Most tubes utilize plastic caps that snap into place over the opening.
If a nozzle seems clogged or blocked with dried adhesive when initially opened up for use, instead of forcefully squeezing the tube, try these remedies:
- Soak just the nozzle overnight in mineral spirits to loosen blockage
- Use a straightened paper clip to gently poke into the opening and clear barriers
- Replace with a new nozzle entirely
Proper ongoing resealing is key to maximize shelf life and avoid wasting liquid nails products over time. Adhering to ideal storage conditions also helps.
Conclusion
Dried out liquid nails tubes can be frustrating to deal with, but they don’t have to spell the end of your project. With some strategic heating methods and a slow, careful approach to opening the tube, you can regain access to the adhesive sealant and complete your job.
Just remember to store liquid nails properly upright in a cool location going forward, and to tightly seal the nozzle after each use. Follow these tips, and you’ll avoid having to deal with hardened liquid nails again!