French Tips For Natural Nails: The Complete Guide
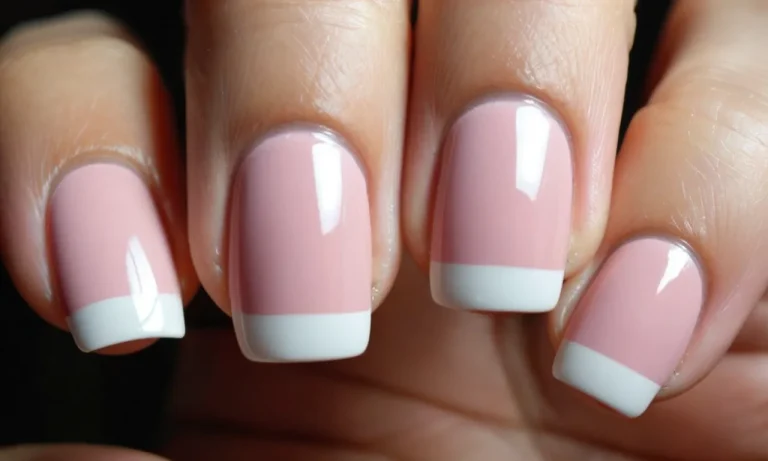
French manicures have been popular for decades, with their classic, polished white nail tips contrasting beautifully against natural nail beds. If you love the clean, professional look of a french manicure but prefer to let your natural nails grow out, you may be wondering how to get the perfect french tips on your bare nails.
If you’re short on time, here’s a quick answer to your question: Carefully apply white nail polish just to the tips of your nails, use nail guides if needed, then finish with a clear top coat for smooth, durable french tips on natural nails.
In this comprehensive guide, we will cover everything you need to know to get salon-quality french tips on your natural nails at home. You’ll learn tips for prepping your nails, using guides for neat lines, choosing the right white polish, and sealing the look with top coat.
Prepare Your Nails
Trim and File for the Best Foundation
The first step for gorgeous, long-lasting French tips is proper nail preparation. Start by trimming and filing each nail into the desired shape using either nail clippers or a nail file. Many experts recommend filing nails into a squoval shape – a squared shape with rounded edges – as this shape complements the French manicure look.
Take the time to get each nail even so your tips will look tidy and uniform. Buff the nails gently to smooth any ridges or imperfections. Proper shaping and buffing creates the perfect foundation for flawless French tips that can last over a week!
Use a Dehydrator or Alcohol Wipes
Before painting on polish, be sure to thoroughly cleanse and dehydrate the nails. OIL is the enemy of a long-lasting manicure! Using a nail dehydrator or isopropyl alcohol on cotton pads, wipe each nail to remove any oil, lotion or residue.
This step preps the nails by removing moisture and oils that can prevent polish from properly adhering. For best results, use an actual nail dehydrator as these are formulated to penetrate and dry out nails. But if you don’t have a dehydrator, alcohol pads also work well.
Take your time and carefully wipe down each nail to guarantee your tips stay put!
Don’t Forget the Cuticles
Now it’s time to tidy up those cuticles! Neatly manicured cuticles help nail polish application look its best. Gently push back cuticles, then carefully remove any excess or ragged bits with a cuticle trimmer or cuticle scissors. Avoid cutting living cuticle tissue as this can lead to infection.
Then use a cuticle remover gel to dissolve any remaining cuticle remnants. These gels work wonders to clean up the nail bed area. After removing dissolved cuticle pieces, wash the nails thoroughly and follow up with a hydrating cuticle oil.
Well-groomed, hydrated cuticles frame the nails perfectly so your elegant French tips will really stand out!
By properly trimming, shaping and dehydrating the nails first, and neatly tending to cuticles after, you create the ideal base for stunning French tips. Taking the time to care for nails before polish makes all the difference for a salon-quality manicure that can last over a week without chipping or peeling.
So don’t skip these prepatory steps – beautiful nails are just moments away!
Use Nail Guides for Perfect Lines
Types of Nail Guides
There are a few popular options when it comes to nail guides for DIY French manicures:
- Plastic French manicure guides – These reusable plastic strips have a curve on one end to fit the tip of your nail and act as a guide for painting straight lines.
- Stick-on French manicure stencils – These single-use paper guides stick right onto your nails and expose just the tip for easy painting.
- French manicure tape – This is simply masking tape or scotch tape that you apply to the skin around each nail before painting to create clean edges.
Most nail artists recommend the reusable plastic guides as they tend to give the most precise, customizable results.
How to Apply Guides
Using a nail guide takes a bit of practice, but follow these steps for best application:
- Prep nails by cleaning and applying base coat as usual.
- Gently press the curved edge of the plastic guide right against the tip of each nail so it hugs the natural shape.
- Paint the exposed nail tip with your white French polish.
- Slide guide off carefully before polish dries.
- Apply color polish over the rest of the nail.
- Seal with top coat and allow to fully dry.
Check out this helpful video on how to use French tip guides from celebrity manicurist Nailedit.
Tips for Neat Results
It can take a few tries before your French tips start looking perfect using guides. Here are some useful pointers:
- Trim nails to desired length before starting so guides fit better against the edges.
- Wipe excess polish from the brush before painting inside the guide for precision.
- If using stick-on stencils, be very gentle removing so you don’t smear polish.
- Apply top coat carefully with a steady hand to avoid bumping French lines.
Patience is key, but with practice you’ll be nail pro status in no time! For more tips checkout Nails Magazine’s guide section.
Select the Right White Polish
Opaque Polishes Work Best
When doing a French manicure, it’s important to use an opaque white polish for the tip rather than a sheer one. Opaque polishes will provide full coverage and really make the white tip ‘pop.’ Sheer white polishes often take multiple coats to build up and can look streaky.
An opaque polish like OPI Alpine Snow is perfect for french tips and will give you a crisp, clean white line in just one or two coats.
Consider Brush Shape
Look for a white polish with a brush that comes to a fine point or has a skinny brush. These brushes make it easier to paint the nail tip in a straight line. Brushes that are wide or rounded make it harder to get precise lines.
A polish like Essie Marshmallow or OPI Funny Bunny have great skinny brush shapes for french manicures.
White Gel Polish is Another Option
Using a white gel polish is great for perfect french tips too. Gels cure hard so the tip is less likely to get dinged up. Gelish White on White is a top choice. Just make sure to prep and apply it properly.
File the nails to the desired shape, push back and clean up the cuticles, then apply a gel primer. Paint on the gel color in thin coats and cure each coat under a gel lamp. Finish with a glossy gel top coat to lock it in.
French tips look simple but selecting the right white polish is key. Opaque, quick-drying formulas with skinny brushes make painting the tips easy. The result is an elegant, polished look that complements any skin tone.
Apply White Polish to Tips
Load the Brush Vertically
When applying the white polish to create the French tips, it’s crucial to load the brush vertically to get a precise application. Hold the bottle with the brush facing upwards and lightly roll the brush against the neck of the bottle so that the polish coats the sides of the brush.This will allow you to paint a thin, straight French tip line.
Wipe Excess Before Painting
After loading the brush, make sure to wipe off any excess polish on the neck of the bottle so you don’t flood the nails. Having too much polish on the brush can result in the French tips looking messy or bleeding onto the rest of the nail.
Wiping it off ensures you only have a small amount of polish on the tip of the brush for that perfect thin white line.
Steady Your Hands
Having a steady hand is key for achieving flawless French tips at home. Here are some tips for keeping your hands stable as you paint:
- Rest your elbow on a flat surface like a table to keep your painting hand grounded.
- Use your non-dominant hand to gently hold your finger in place as you paint with the other.
- Take deep breaths to remain calm and focused.
- Work in a brightly lit area so you can see the nails clearly.
- If your hands shake, try using a finger brace for extra stability.
Rushing through the painting process can lead to messy tips and polish flooding the cuticles. Take your time and don’t stress – you can always use a small brush dipped in remover to clean up any polish that gets on the skin.
Finish with a Top Coat
Glossy Top Coats
A glossy top coat is a must for any French manicure. The high-shine finish helps lock in the white tip and gives your nails an ultra-glossy, polished look. Choose a quick-drying top coat formulated to prevent chipping and extend the life of your manicure.
Popular options include Seche Vite Dry Fast Top Coat and Essie Good To Go Top Coat.
When shopping for a glossy top coat, look for formulas labeled as fast-drying, chip-resistant, and high-shine. Thinner top coats tend to dry quicker and give a smooth, glass-like finish. Using a top coat like Seche Vite or Sally Hansen Insta-Dri can help prevent smudging or denting immediately after painting.
Apply a thin, even layer of top coat over each nail after the polish has fully dried. Let it dry completely before doing anything with your hands. For maximum shine and protection, add a second coat. Reapply every 2-3 days or when you notice your manicure starting to look dull.
Matte Options
A matte top coat offers a more subtle, velvety finish for your French manicure. Matte nail polish has become a huge trend, as it creates a chic, modern look. Best of all, matte tops coats help disguise imperfections or ridges in the nails.
Some popular matte top coats for French manicures include OPI Matte Top Coat and Essie Matte About You. These help dull down the shine for a more natural, powdery appearance. Make sure you apply it very thinly and evenly to prevent streaking.
Matte top coats work best over regular polish, not gel. They create a smooth, velvety finish that contrasts nicely with the crisp white French tip underneath. However, matte polishes show oil and dirt more easily.
Using a matte top coat helps tone down the super glossy look of a traditional French mani.
Quick-Dry Formulas
Quick-dry top coats are a life-saver for creating perfect French tips at home. Smudging or denting the tips before they fully cure is a common issue. Using a fast-drying top coat helps “freeze” the white polish in place.
Good quick-dry options for French manicures include:
– Sally Hansen Insta-Dri Top Coat
– Seche Vite Dry Fast Top Coat
– Essie Speed Setter Top Coat
These formulas dry to the touch in 60 seconds or less when applied in a thin layer. This prevents smearing of the tips when you need to get on with your day. You’ll get a glossy, hardened finish right away.
Quick-dry top coats work best when the underlying polish layers are already dry. Apply a thin, even coat and let sit for the full drying time listed on the bottle. While not always quite as shiny or long-lasting as regular top coats, they offer a fast fix for perfecting your DIY French tips.
Conclusion
With some preparation and the right techniques, you can achieve stunning, professional-looking french tips on your natural nails at home. Invest in high-quality products like an opaque white polish and nail guides for the most flawless results. Don’t forget to seal in your manicure with a top coat.
With practice, you’ll be able to get salon-worthy french tips on your bare nails for a classic, polished look.