Damaged Nail Bed: How To Heal Your Nails After Acrylics
If you recently removed your acrylic or gel nail enhancements and noticed your natural nails are damaged underneath, you’re not alone. Many people struggle with brittle, thin, cracked, or even separated nails after taking off acrylics or other nail extensions that were glued onto the natural nail plate.
Here’s the good news: With some TLC,Almost all nail damage caused by acrylic or gel polish is reversible if you care for your nails properly. Within a few months, you can have strong, healthy nails again.
What Causes Nail Damage After Acrylics
Lifting the acrylic off your nail bed
Forcing acrylic nails off the natural nail plate can rip layers of your actual nail off, leaving the nail bed exposed and vulnerable. This aggressive removal damages the nail matrix where new nail cells are formed and prevents proper regrowth.
Using metal tools increases chances of lifting off pieces of your real nail (yikes!). Letting a professional soak off gels/acrylics with acetone reduces chances of trauma.
Filing off enhancements too aggressively
Being overzealous while filing acrylic/gel polish can thin and weaken the natural nail underneath over time. The friction and pressure of filing can slowly grind down layers of keratin making nails thin, brittle and prone to peeling or cracking vertically.
Using gentle filing motions and quality nail files is key for healthy, strong nails that grow properly.
Not removing acrylic properly with acetone
Neglecting to fully dissolve acrylic nails with pure acetone allows product to stay stuck to the natural nail plate. Trying to pry off remaining acrylic pieces pulls up layers of nail cells. For safe, non-damaging removal, WebMD recommends filing down enhancements then soaking cotton balls soaked in acetone on nails for 15-20 minutes until product fully breaks down.
Picking at lifted acrylic
The temptation to peel, pull or pick at lifted acrylic or gel polish should be resisted at all costs! This can easily remove chunks of your real nail causing damage. Gently file off lifted edges then let acetone work to dissolve the rest instead of forcing it off.
Bad nail habits like picking and overfiling cause more harm than good.
Signs Your Nails Are Damaged After Acrylics
Thin, peeling, soft, or brittle nails
After removing acrylic or gel nail enhancements, you may notice your natural nails seem quite thin and soft. The artificial nails act as a shield and prevent your natural nails from being exposed to normal wear and tear. Once removed, your nails have lost some of their density and strength.
Peeling, flaking, brittleness are common. This can leave nails feeling delicate and prone to splitting or layers peeling away.
Discoloration or bruising under the nail
During an acrylic or gel manicure, the natural nail plate is filed down to create a rough surface for product application. Filing too aggressively can cause trauma and bruising to the nail bed. You may see black and blue discoloration or red spotting under the nail after removing enhancements.
This bruising eventually grows out as the nail plate regrows. Nail plate yellowing can also occur with enhancements.
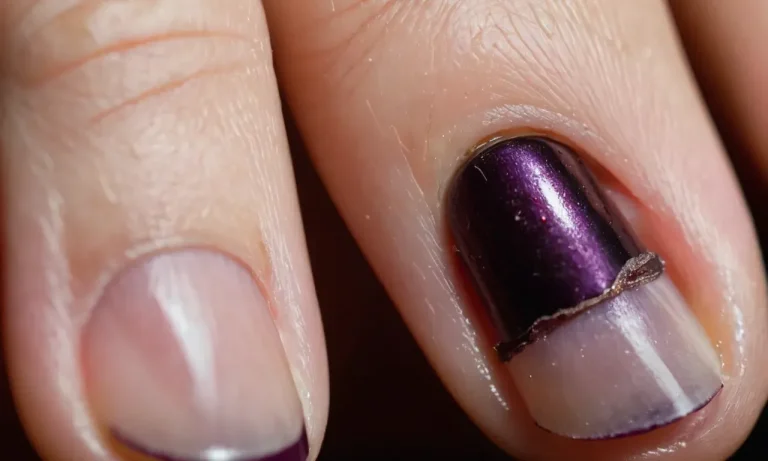
Separation of the nail bed from the nail plate
One risky side effect of acrylics or gels is that they can cause the nail plate to separate from the nail bed. This is known as onycholysis. It happens when bond between the nail plate and nail bed weakens. You’ll see a white/clear gap between the nail plate above and the nail bed below.
It leaves you prone to infection. This separation may start at the tip of the nail and work backwards as more of the nail plate detaches. Seeking professional medical care is recommended if you notice onycholysis.
Breakage and cracks
Without the artificial support of enhancements, your real nails may seem quite fragile and weak. Don’t be surprised if you notice more cracking, chipping, splitting and breakage of your natural nails after removing acrylics or gels. Even just a minor knock can cause cracks and chips.
Press-on nails, tips, overlays damage the nail plate. So after removal, your nails are more vulnerable. Use moisturizing nail creams and oils to hydrate and strengthen. Avoid excessive water exposure. Consider taking biotin supplements to nourish nails.
How to Treat and Heal Damaged Nails
Use cuticle oil multiple times per day
Applying cuticle oil 2-3 times per day is crucial for nourishing damaged nails and cuticles after acrylic removal. The oil moisturizes the nail bed, softens cuticles, and improves nail health. Choose a cuticle oil containing vitamins and nutrients like vitamin E, coconut oil, jojoba oil, etc.
Massage a few drops into each nail and cuticle for 30-60 seconds per nail. This stimulates blood circulation to aid healing.
Apply a strengthening base coat
Using a strengthening base coat helps protect fragile nails as they regenerate. Base coats fortify nails and prevent further chipping or peeling. They also help nails hold onto nail polish better. Apply a base coat first before painting nails. Let it dry completely before adding color.
Reapply the base coat every 2-3 days while nails heal.
Consider nail treatments with biotin or protein
Damaged nails may benefit from extra nutrients like biotin and protein to regenerate tissue. These ingredients are found in some nail polishes, treatments, cuticle serums, etc. Biotin helps produce keratin, a protein nails contain. It supports healthy nail growth.
Protein bonds directly to nails to reinforce strength. Using these types of targeted nail products 1-2 times daily helps reconstruct cracked, brittle nails.
File nails gently into better shape
Gently filing nails helps shape them properly as they grow out. This removes any jagged edges for a smoother look. Always file nails carefully in one direction starting from the outside edges in, without pressing too hard. Harsh filing can further damage the nail surface.
Use a fine grit emery board and avoid metal nail files. File nails every 2-3 days as needed while they regenerate tissue.
Avoid using nail polish for a few weeks
It’s best not to apply colored nail polish until nails have had time to heal, which takes a few weeks. The chemicals in polish can irritate and dry out damaged nails. Let nails breathe by leaving them polish-free while nourishing them with treatments.
This allows them to regenerate tissue properly after acrylics. Once nails appear stronger in a few weeks, an occasional clear strengthening polish is OK if desired.
Following these tips helps treat cracked, brittle nails after removing acrylics or other salon manicures. Be patient, as it takes nails around 6 months to fully regenerate. With consistent nail care and moisture, they can return to a healthy state again over time.
Use stunning nail designs again once nails have restored their strength and appearance.
When to See a Doctor About Nail Damage
An injury causes a nail to separate fully from bed
If one of your nails becomes completely detached from the nail bed due to injury, it’s important to see your doctor. According to the American Academy of Dermatology, a separated nail won’t reattach on its own because it has lost its blood supply and connection to the nail bed.
Seeing a doctor right away gives the best chance for the nail to reattach properly.
The doctor may remove the damaged part of the nail and bandage the finger to protect it while the nail bed heals. They can also prescribe antibiotics to prevent infection. With prompt treatment, the nail has a good chance of growing back attached normally over the next several months.
You have signs of a nail infection
Nail infections are common after acrylic nail damage. Signs include redness, swelling, throbbing pain, pus, foul odor, and changes in nail color or texture. If you notice these, see your doctor because untreated fungus and bacterial infections can lead to permanent nail deformities or even finger bone infections.
For nail fungus, your doctor may prescribe oral antifungal medication. Bacterial infections are treated with antibiotic pills or creams. Catching infections quickly leads to better outcomes. Using over-the-counter antifungal creams without an official diagnosis can worsen the infection.
Home care isn’t improving nails after 2 months
It’s normal for nails to look damaged right after removing acrylics – they may have uneven surfaces, ridges, or white spots. With proper home care like moisturizing and filing, nails should start to improve within 8 weeks.
If your nails still look unhealthy after 2 months, see your doctor to rule out underlying conditions. Damaged nails could result from medical issues like psoriasis, eczema, diabetes, or nutritional deficiencies. Identifying and managing these leads to better nail regrowth.
The doctor can suggest prescription treatments like ointments, injections, or oral medications tailored to your condition. Following their treatment plan gives you the best chance of getting your nails back to full health.
How to Prevent Nail Damage When Getting Acrylics
Have acrylics removed properly by a technician
One of the biggest causes of nail damage from acrylics is improper removal. Skipping your nail appointment and trying to remove acrylics yourself can lead to peeling, cracking, and thinning of the natural nail.
The safest way to remove acrylic nails is by having a professional technician soak them in acetone and gently file off the product. This helps avoid ripping off layers of your real nail. Leaving acrylics on too long can also weaken the nail bed.
Staying on schedule for fill appointments every 2-3 weeks can help prevent lifting and breakage.
Give nails a break between sets
Giving your natural nails a chance to breathe in between acrylic sets is crucial for maintaining nail health. Acrylic nails don’t allow any moisture to reach the natural nail plate, leading to dryness and brittleness.
Taking a break of 2-4 weeks between sets allows moisture to get to the nail bed and helps strengthen nails. You can use a nourishing oil to massage into nails and cuticles during acrylic-free weeks. This gives overworked nails time to recover!
Use a nourishing nail strengthener
Using a nail strengthener underneath acrylics can majorly improve nail health. Strengtheners work by providing extra protein to nails to help reinforce thin or peeling ones. When applied regularly under acrylics, strengtheners act as a protective barrier against damage.
They also keep nails more flexible so they don’t crack or split as easily. Look for strengtheners containing hydrolyzed wheat protein and calcium, both of which fortify weak nails. Using cuticle oil daily will also hydrate the nail bed and prevent excessive dryness from acrylics.
Avoid very long or thick acrylics
The longer or thicker your acrylic nails, the more stress it puts on your natural nails. Very long nails beyond your fingertip add a lot of pressure and risk of cracking or breaking. Having acrylics applied too thickly also strains the nail bed as it has to work harder to support the weight.
This can pull up the natural nail underneath over time. To reduce the risk of damage, keep acrylics at a shorter, moderate length and ask your tech for a medium thickness. Thinner acrylics are gentler on nails than thick, bulky ones!
Conclusion
While acrylic and gel nail enhancements can damage the natural nail underneath, almost always this damage is temporary. With diligent nail care over the next few months and avoiding additional acrylic or gel polish applications until your nails recover, you should be able to regain strong, healthy nails.
Be patient through the healing process. It can take 12 weeks or longer to see significant improvement. Avoid picking at nails or peeling layers, which slows regrowth. If you take excellent care of your natural nails moving forward, they’ll soon look and feel better than ever!